5. How can it be changed?
First of all, to be able to change an HTML document, we have to save it in our folder.Once saved we can modify it by opening it with the Text Editor.
Exercise 3: Modifying a web page.
|
Next we'll explain how to edit texts, how to create lists , how to create links and how to insert images.
Exercise 4: Edit a text.
|
5.1. TEXT-EDITING
It's important to use common font families to make sure that all the servers, browsers and computers are able to identify them correctly. That's why it's better to use the families "Verdana, Arial, Helvetica". Like this, if a computer cannot identify the font "Verdana", it will use "Arial or Helvetica" in any case.5.1.1. TEXT FONT:
Font text: Verdana
Font size: 8
Font color: blue
All the orders that define the definite font of a text: face, size, colour... can be in one tag with the name font at the beginning:
<font face="verdana" size="8" color="blue" >
CODE:
<font face="verdana"> Font text: Verdana </font> <font size="8"> Font size: 8 </font> <font color="blue"> Font color: blue </font> |
5.1.2. LINE BREAK:
By editing texts what is essential are line breaks that are inserted with the tag <br>. It is a single tag that hasn't to be closed.
This is because the webs adapt themselves to the width of the windows and make that the entire content is moved mixing itself up.
Example for the use of a line break:
To be
or not to be.
CODE:
<font face="verdana" size="2" color="blue">To be <br> or not to be. |
5.1.3. BLANK SPACE:
If you want to put in a blank space between words, images, tables or any kind of element, you'll have to do the following task. With the blank character key we're normally using when we're writing it's just possible to insert a blank space between words, for the rest of the elements it's not working like this and we have to use the following tag:
side A side B
CODE:
side A side B |
(In this example we put in five blank spaces to make it visible)
5.1.4. HEADER:
header level 2
header level 5
CODE: <h2> header level 2 </h2> <h5> header level 5 </h5> |
5.1.5. PARAGRAPH:
first paragraph
second paragraph
CODE: <p> first paragraph </p> <p> second paragraph </p> |
5.1.6. BOLD: bold
CODE:
<b> bold </b> |
5.1.7. ITALIC: italic
CODE:
<i> italic </i> |
5.1.8. UNDERLINED: underlined
CODE:
<u> underlined </u> |
Exercise 4: Create an ordered list at the beginning of your page web02.html (before the text) with the points:
|
| Exercise 5: In the text we have modified before, change the ordered list (a/b/c) into a unordered list. |
5.2. LISTS
5.2.1. ORDERED LIST:- first
- second
- third
Ordered list: <ol> <li> first </li> <li> second </li> <li> third </li> </ol> |
If you want to order the list with "abc" instead of "123" you'll have to add this to the tag <ol> : <ol type="a">
5.2.2. UNORDERED LIST:
- first
- second
- third
Unordered list: <ul> <li> first </li> <li> second </li> <li> third </li> </ul> |
Exercise 6: Create links from your web page (web02.html) to the following pages:
|
5.3. LINKS
When you want to add a link you can do so in two different ways:
2. When you navigate inside of documents that are in your folder (for example your web page: web01.html), you'll have to give it its relative reference (folder system). This will be explained later.
External navigation links
To create a link to a web page the isn't in your folder (a web page you don't have), you'll have to fill in its URL adress (absolute reference):
<a href="http://address URL.jpg" </a>
5.3.1. LINK TO A WEB PAGE: ETSAV
CODE:
<a href="http://etsav.upc.edu/"> ETSAV </a> |
5.3.2. LINK TO AN E-MAIL ADDRESS: contact
CODE:
<a href="mailto:writetome@writetome.com">contact</a> |
Exercise 7: Create the following links for internal navigation next as described in the next point:
|
Links for internal navigation
If you want to create a link to an html document that you have saved in one of your folders on your computer, you're navigating internally and what you'll have to di is to hgive it the "internal address" of were to find the document (relative reference).To give the relative reference of a document, you have to follow this orders:
a) if the document that you want to link is in the same folder than the html document you're working on, you only have to type in the name of this very document:
<a href="name document html" </a>
b) if the document is saved in a subfolder of the same folder, you have to write first the name of the subfolder, then a bar (/) and then the name of the document:
<a href="name subfolder/name document html" </a>
c) if the document is saved in a different folder then the one the html document you're working on is saved in, you have two write two points and a bar (../) as many times as folders and subfolders there are and at the end type in the name of the document:
<a href="../name folder of the document/name document html" </a>
5.3.3. LOCAL LINK:
Curs d'introducci� a la construcci� del portfoli
CODE:
<a href="cp01.html"> Curs d'introducci� a la
construcci� del portfoli </a>
|
5.3.4. LINK TO A CERTAIN POINT OF A PAGE:
The "anchoring with name" is used to create a table of contents at the beginning of a big document. Every chapter of the document gets an "anchoring with name", and there is a connection from each anchorage to the upper part of the document.
That is to say if you want, for example, go from here to point 5.2. LISTS, you have to insert the following code:
CODE:
 <a href="#lists"> Go to point
                      5.2. LISTS </a>
|
And from point 5.2. LISTS, at the title you have to write:
CODE: <a name="lists"> 5.2. LISTS </a> |
If you want that the link is opened in a new page, you have to add this order: target="new" between the brackets:
<a href="cp01.html" target="new"> see file </a>
To change the colour of the links you have to add the following orders to the tag <body>:
for a normal link: link="blue"
for a visited link: vlink="red"
for active links (at the moment of clicking): alink="orange"
Like this, <body link="blue" vlink="red" alink="orange">
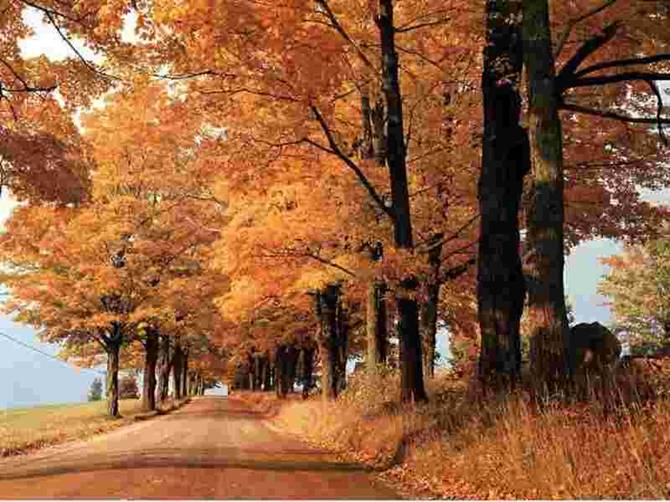
Exercise 8: Insert this image to your web page (web02.html):
|
5.4. IMAGES
5.4.1. INSERT IMAGES:
CODE:
<img src="sea.jpg"> |
It's important to determine the size of the image to control that it's neither too big nor too small. You can do so by fixing the width or the height in the tag of the image, in this case we fix the width (pixels): width="300".
CODE:
<img src="sea.jpg" width="300"> |
To border the image with a line around the outline of the image, use the attribute "border=1" (or higher).
CODE:
<img src="sea.jpg" width="300" border="1"> |
You can also put a name above the image. This is made with the attribute "alt" and gives alternative information about an image if the user cannot see the image out of any reason (a slow connection, an error in the source attribute, or if the user is using a screen reader).
CODE:
 <img src="sea.jpg" width="300" border="1"
                          alt="sea view">
|
Exercise 9: You have to make this image appearing in your document without saving it in your folder. (You'll see that this is an image-link that takes you to the web page of the image).
|
5.4.2. IMAGES - LINKS:
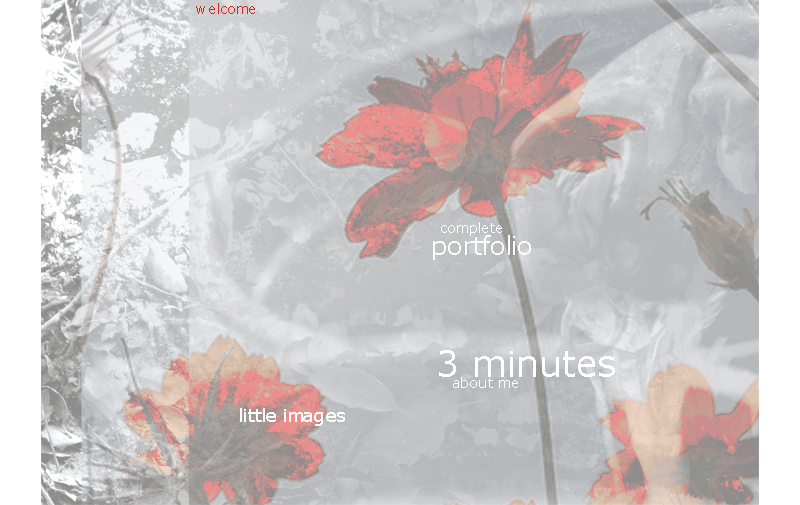
If you want to convert an image into a link on another page:
CODE:
<a href="http://www.beatricebonzanigo.com/index.html"> <img src="bbhp.gif" width="300"></a> |
(You can see here that the image was saved in the folder before and that, by opening the image, you give it his relative reference:
<img src="bbhp.gif">)
| Exercise 10: Create an image-link to the ETSAV using the logo of the school as an image with a width of 50 pixels. |
More information about font types:
Verdana
Times New Roman
Courier
For further information about images: types, size, recommendations of use and hints to create interactive images and animated GIF's, go to: Images